Most homeowners treat refrigerator temperature like a set-it-and-forget-it proposition, spin the dial to somewhere in the middle and hope for the best. That approach might keep milk cold, but it won’t necessarily keep food safe or prevent your energy bill from creeping higher than it needs to. The difference between 37°F and 42°F might seem trivial, but it’s the line between safe food storage and potential bacterial growth. Getting this right takes less than five minutes and requires nothing more than a thermometer you probably already own.
Table of Contents
ToggleKey Takeaways
- The ideal refrigerator temperature should be set between 35°F and 38°F, with 37°F as the optimal sweet spot for food safety and energy efficiency.
- How cold a refrigerator should be matters because bacteria multiply fastest in the 40°F to 140°F danger zone, and running at 37°F instead of 40°F can double the safe storage time for perishables.
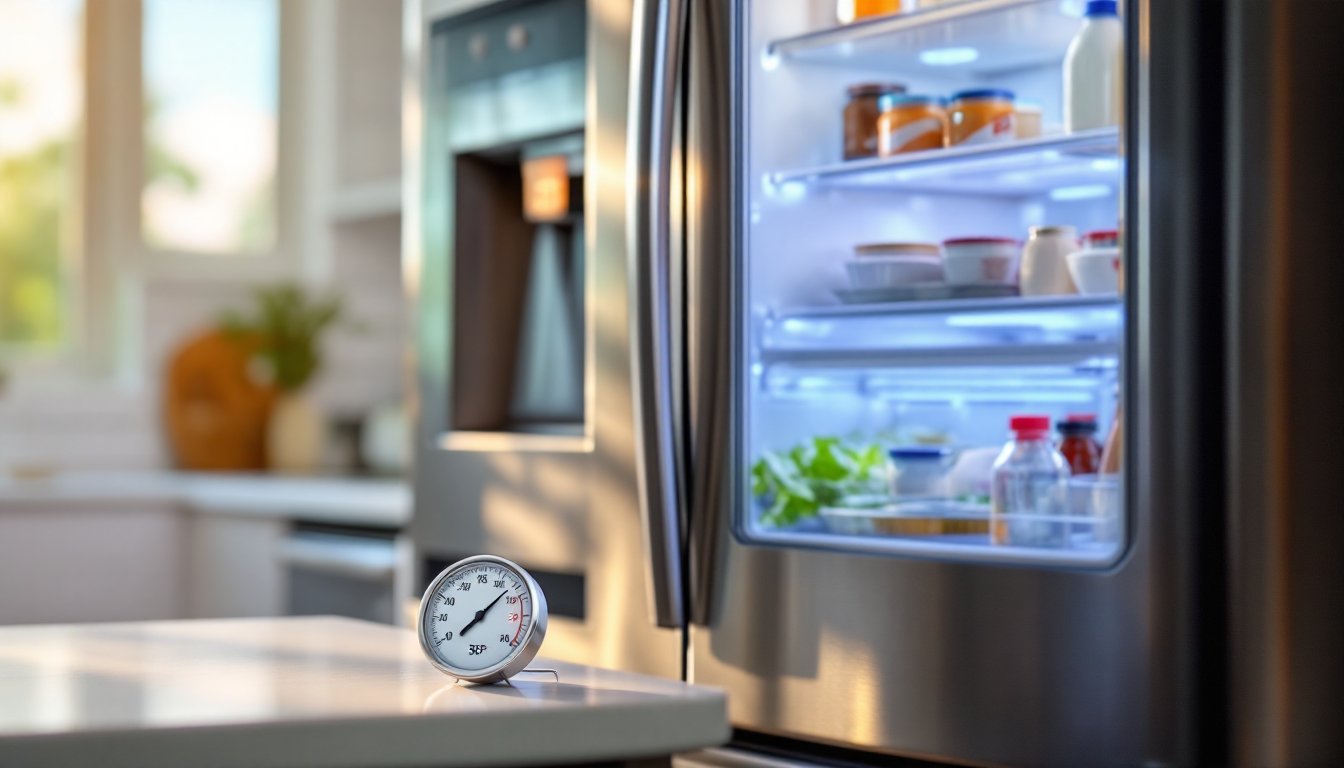
- Always measure your fridge’s actual temperature with a standalone thermometer since dial numbers aren’t calibrated to degrees—placing it on the middle shelf for at least 8 hours gives the most accurate reading.
- Running your refrigerator colder than 37°F wastes approximately 5% more energy per degree without improving food safety, potentially costing $20 to $30 extra annually.
- Common temperature problems like warm fridges are usually caused by dirty condenser coils, faulty door seals, or blocked air vents—all fixable issues that don’t require professional repairs.
- After adjusting your refrigerator temperature, wait 24 hours before checking again, as fridges don’t stabilize instantly and frequent tweaks create confusion.
The Ideal Refrigerator Temperature Range
The ideal refrigerator temperature falls between 35°F and 38°F (1.7°C to 3.3°C), with 37°F being the sweet spot for most households. This range keeps perishables cold enough to slow bacterial growth without freezing delicate items like leafy greens or fresh herbs.
The USDA recommends keeping refrigerators at or below 40°F (4°C), but that’s the upper safety limit, not the target. Running right at 40°F gives you zero margin for error, door openings, warm groceries, and power fluctuations can all push temps temporarily higher. Setting your fridge to 37°F builds in a safety buffer while still keeping food fresh.
For freezers, the standard is 0°F (-18°C). Unlike refrigerators, freezers don’t benefit from running colder, 0°F halts bacterial activity completely, and going lower just burns more energy without improving food preservation.
Most modern refrigerators use a dial numbered 1 through 5 or 1 through 9, with higher numbers meaning colder temps. These aren’t calibrated to actual degrees, which is why a separate thermometer is essential. The normal refrigerator temperature setting usually lands around the midpoint, but the only way to know for sure is to measure it.
Why Refrigerator Temperature Matters for Food Safety
Bacteria multiply fastest between 40°F and 140°F, a range food safety experts call the “danger zone.” At 40°F, bacterial growth slows significantly. At 37°F, it slows even more. That three-degree difference can double the safe storage time for leftovers, deli meats, and dairy.
Foodborne pathogens like Listeria, Salmonella, and E. coli don’t announce themselves with off smells or visible mold in the early stages. A refrigerator running at 45°F might keep food cold to the touch but still allow these bacteria to thrive. The Centers for Disease Control estimates that 48 million Americans get sick from foodborne illness each year, many from improperly stored food that seemed fine.
On the flip side, running too cold (below 32°F) starts freezing items that shouldn’t freeze. Lettuce turns to mush, milk develops ice crystals, and condiments separate. Eggs can crack in their shells. These aren’t just quality issues, frozen and thawed produce loses texture and nutrients.
Energy costs also shift with temperature. For every degree below 37°F, a refrigerator uses roughly 5% more energy without meaningful food safety gains. Over a year, that adds up. A fridge set to 32°F might cost $20 to $30 more annually than one at 37°F, depending on local rates and the unit’s efficiency rating.
How to Check Your Refrigerator’s Temperature Accurately
Most built-in fridge thermometers are cheap, inaccurate, or both. The reliable method uses a standalone appliance thermometer or a standard digital probe thermometer.
Materials needed:
- Refrigerator thermometer (analog or digital)
- Glass of water (optional, for stability)
Steps:
-
Place the thermometer in the center of the middle shelf, away from walls and the door. This is the most representative spot for overall fridge temp. Avoid the door shelves, they run 5°F to 10°F warmer than interior shelves.
-
Let it sit for at least 8 hours, ideally overnight. Refrigerators cycle on and off, and temps fluctuate by a few degrees during each cycle. A single reading after 10 minutes doesn’t tell you much.
-
Check the reading without opening the door for long. If using a digital thermometer with a probe, you can run the wire out the door seal without affecting the internal temp.
-
Repeat in multiple spots if you’re troubleshooting uneven cooling. Check the top shelf, bottom shelf, and back corners. Temp variation of 5°F or more across zones suggests airflow blockage or a failing component.
For an even more accurate reading, place the thermometer in a glass of water on the middle shelf. Water moderates temperature swings, giving you a steadier average. Maintaining proper fridge temperature is easier when you have reliable baseline data.
Don’t rely on dial settings. A “3” on one fridge might equal 38°F, while the same setting on another model runs at 42°F. Measure, don’t guess.
Adjusting Your Refrigerator Temperature Settings
Once you know the actual temp, adjustments are straightforward, but they take patience. Refrigerators don’t respond instantly like a thermostat.
Steps to adjust:
-
Turn the dial or digital control in small increments. On a 1-to-5 dial, move it by one number. On digital models, adjust by 1°F to 2°F at a time.
-
Wait 24 hours before rechecking. It takes that long for the fridge to stabilize after a change. Making multiple tweaks in one day just creates confusion.
-
Recheck with the thermometer after the waiting period. If you’re still off target, make another small adjustment and wait again.
-
Account for seasonal changes. A fridge in an un-air-conditioned garage or a basement that drops to 50°F in winter will behave differently than one in a climate-controlled kitchen. Ambient temperature affects compressor run time and internal temps.
If your fridge has separate controls for fresh food and freezer compartments, adjust them independently. Freezer settings sometimes influence fridge temps on single-compressor models, so tweak the fridge setting first, let it stabilize, then adjust the freezer if needed.
Don’t overfill the fridge. Blocking air vents with stacked containers prevents cold air circulation and creates warm pockets. Leave space around vents (usually located at the back or top of the interior) and avoid cramming shelves to the point where air can’t move.
If you’ve adjusted multiple times and can’t reach the target range, you’re likely dealing with a mechanical issue, not a settings problem.
Common Temperature Problems and How to Fix Them
Refrigerator Running Too Warm
Temperature reading 42°F or higher even though adjustments:
-
Dirty condenser coils are the most common cause. Dust buildup on coils (usually behind or beneath the fridge) insulates them and prevents heat dissipation. Unplug the unit, pull it away from the wall, and vacuum the coils with a brush attachment. Do this every six months.
-
Faulty door seals (gaskets) let cold air escape. Close the door on a dollar bill, if you can pull it out easily, the seal isn’t tight. Replacement gaskets cost $50 to $150 and snap or screw into place, though the clips can be finicky. Clean existing gaskets with warm soapy water first: sometimes debris prevents a good seal.
-
Overloading or blocking vents restricts airflow. Check that vent openings aren’t covered by food containers. Move items away and see if temps drop within 24 hours.
-
Frequent or prolonged door openings flood the interior with warm air. A fridge in a busy kitchen setup that’s opened every few minutes won’t maintain steady temps. Minimize browsing time and close the door firmly.
-
Failing compressor or refrigerant leak requires a technician. If coils are clean, seals are good, and the fridge still won’t cool, don’t attempt DIY repairs, refrigerant systems are pressurized and regulated. Expect diagnostic fees of $75 to $150, with repair costs varying widely.
Refrigerator Running Too Cold
Temperature reading below 35°F, with frozen items:
-
Thermostat or temperature sensor issues can cause over-cooling. If adjusting the dial doesn’t change the temp, the control mechanism may be stuck or broken. Replacement thermostats range from $25 to $100 and typically require basic disassembly.
-
Damper stuck open (on models with automatic airflow control between freezer and fridge) floods the fresh food compartment with freezer air. Listen for airflow near the vents when the compressor runs, if it’s constant and strong, the damper might be jammed. This repair usually requires a service call.
-
Items frozen near the back wall even when the overall temp is correct suggests the fridge is in a defrost cycle issue or the evaporator fan is over-running. Move sensitive items to the front or middle shelves, which run slightly warmer.
Most temp issues come down to airflow, seals, or dirty coils, all fixable without a service call. If you’ve addressed those and the problem persists, the compressor, control board, or refrigerant system is likely involved, and that’s when you call a pro.